





Solid State Drives (SSDs) have become the standard for fast, reliable storage in modern computers. Unlike traditional Hard Disk Drives (HDDs), SSDs use flash memory, offering superior speed, durability, and energy efficiency. However, like all electronic components, SSDs have a finite lifespan and can degrade over time. Understanding how to check SSD health is crucial for maintaining data integrity, preventing unexpected data loss, and ensuring your system continues to perform optimally. This article will guide you through the essential methods and metrics for monitoring your SSD’s condition, helping you proactively manage its longevity.
Understanding SSD Longevity and Failure Indicators
SSDs are known for their robustness, lacking the moving parts that make HDDs susceptible to mechanical failure. However, their flash memory cells can only endure a limited number of write cycles before they begin to wear out. This characteristic defines an SSD’s ssd life expectancy. Factors influencing this lifespan include the type of NAND flash (SLC, MLC, TLC, QLC), the drive’s capacity, and the intensity of write operations it performs daily. Proactive ssd health monitoring is essential because an SSD typically doesn’t give much warning before failure, unlike an HDD which might exhibit audible clicks or grinding sounds.
Understanding SSD Failure: Wear Is Not the Only Risk
SSD wear is only one possible cause of drive failure. An SSD can also develop problems because of controller failures, firmware issues, overheating, power interruptions, physical damage, or problems with the computer’s storage interface. For this reason, a low wear percentage should not be treated as a guarantee that a drive cannot fail.
This is also why regular backups remain important even when an SSD health tool reports that the drive is in good condition. Health monitoring can help identify warning signs, but no monitoring tool can predict every possible hardware failure.
Recognizing Bad SSD Symptoms: How to Tell if Your SSD is Failing
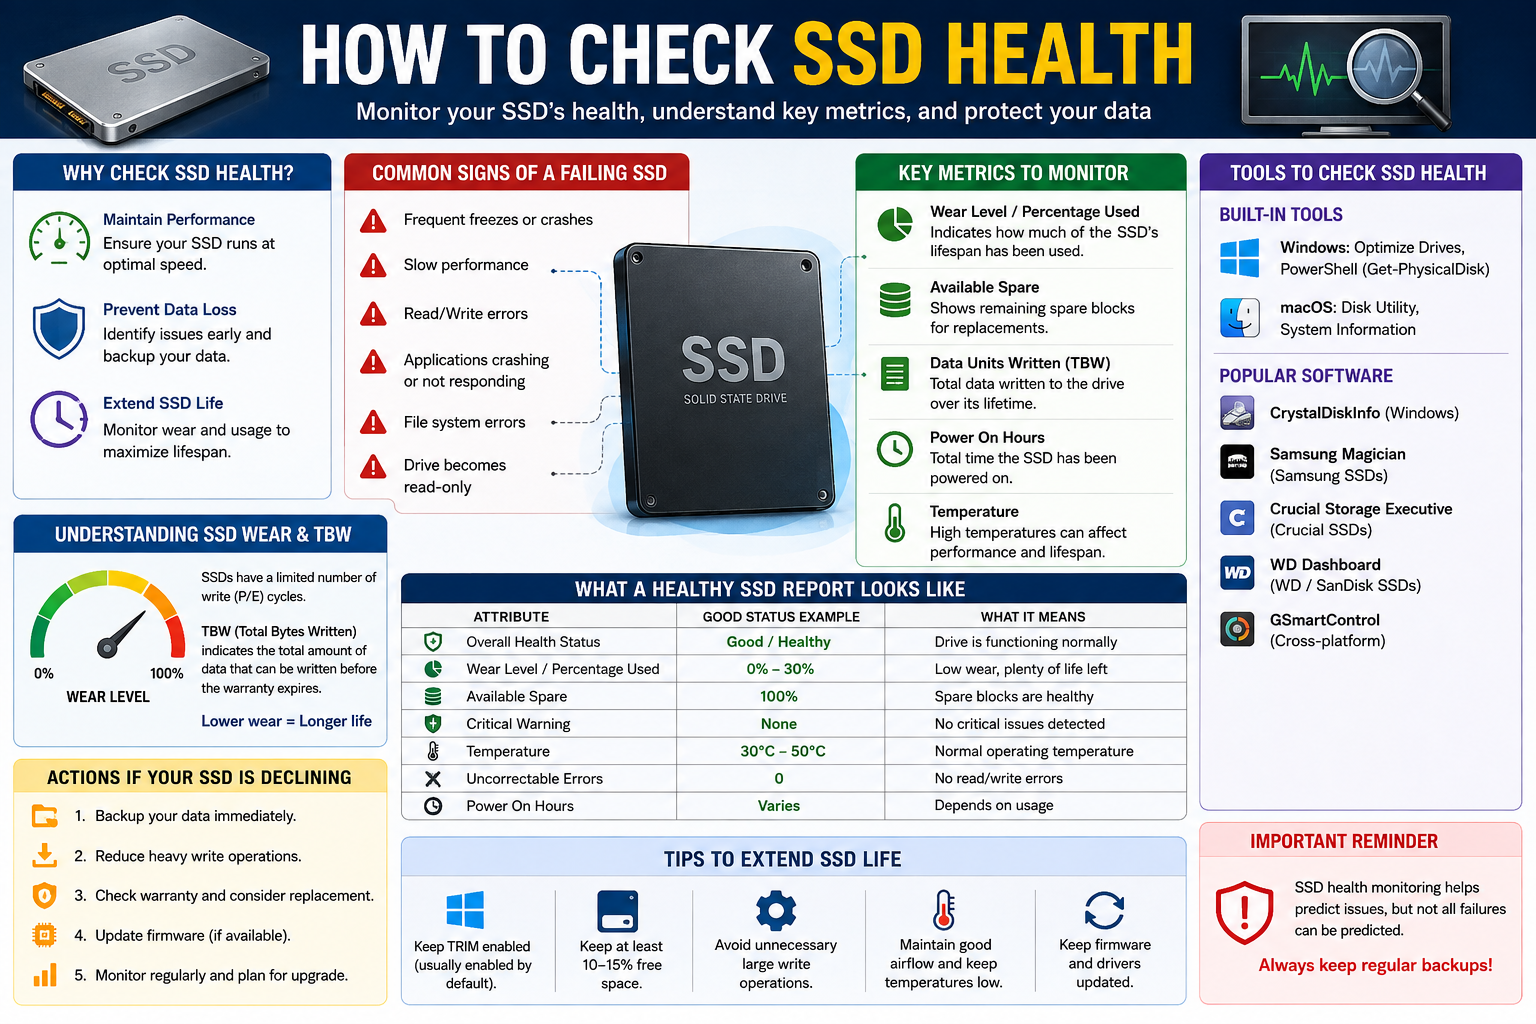
While SSDs are generally reliable, they do exhibit signs when their health is declining. Recognizing these bad ssd symptoms early can provide an opportunity to back up data before a complete drive failure. Here are common indicators that can help you understand how to tell if ssd is failing:
Frequent Freezes or Crashes: Your system might freeze randomly, especially during data-intensive tasks, or experience unexpected crashes (Blue Screen of Death on Windows, kernel panics on macOS).
Slow Performance: While SSDs are fast, a noticeable slowdown in boot times, application loading, or file transfers can indicate an issue.
Read/Write Errors: You might encounter errors when trying to open, save, or move files, or the system might report that files are corrupted or unreadable.
Applications Crashing or Not Responding: Programs installed on the SSD may frequently crash or become unresponsive.
File System Errors: The operating system might report file system corruption, requiring disk checks or repairs.
Drive Becomes Read-Only: In some cases, an SSD might enter a read-only mode, preventing any new data from being written to it. This is often a protective measure before complete failure.
If you observe one or more of these symptoms, it’s a strong signal to investigate your SSD’s health immediately.
Important: SSD Symptoms Can Have Other Causes
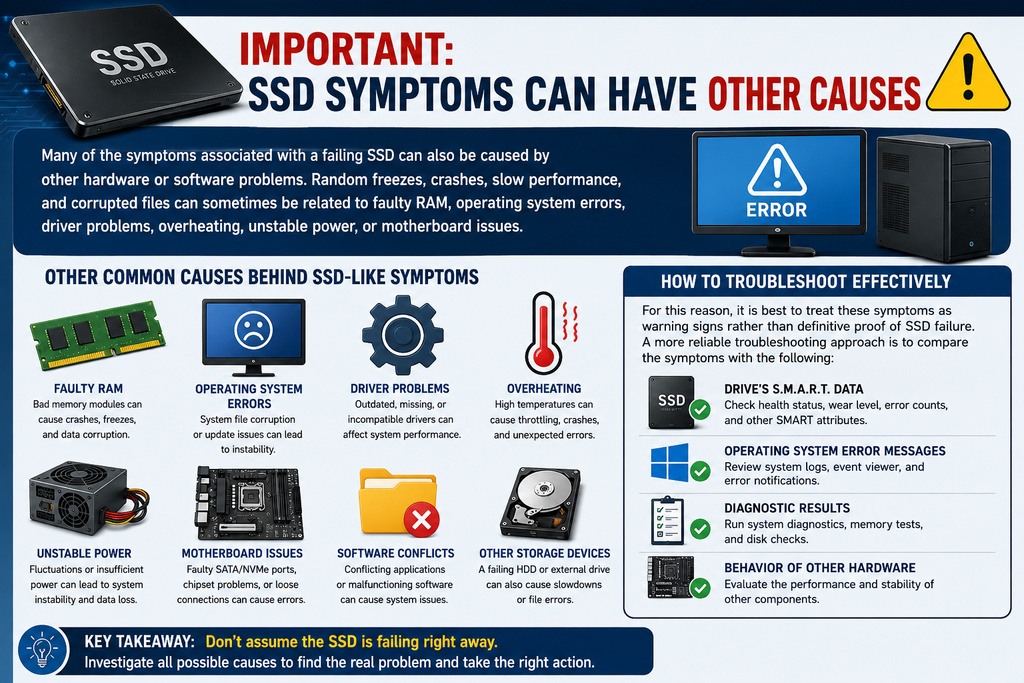
Many of the symptoms associated with a failing SSD can also be caused by other hardware or software problems. Random freezes, crashes, slow performance, and corrupted files can sometimes be related to faulty RAM, operating system errors, driver problems, overheating, unstable power, or motherboard issues.
For this reason, it is best to treat these symptoms as warning signs rather than definitive proof of SSD failure. A more reliable troubleshooting approach is to compare the symptoms with the drive’s S.M.A.R.T. data, operating system error messages, diagnostic results, and the behavior of other hardware components.
Key Metrics for Assessing SSD Health
To accurately assess an SSD’s condition, it’s necessary to look beyond surface-level symptoms and examine specific technical metrics. These metrics provide insight into the drive’s wear and potential issues, helping you to check ssd wear level and understand its internal state through ssd smart data explained.
Checking SSD Wear Level: Understanding TBW and P/E Cycles
The most critical metric for an SSD’s longevity is its wear level. SSDs have a finite number of program/erase (P/E) cycles that their NAND flash cells can endure. Each time data is written to and erased from a cell, it contributes to wear. Manufacturers specify an SSD’s endurance using a metric called Total Bytes Written (TBW). This value indicates the total amount of data that can be written to the drive over its lifetime before its warranty expires or its reliability significantly degrades. For example, an SSD with a 300 TBW rating can have 300 terabytes of data written to it. As data is written, the wear level increases, typically represented as a percentage (e.g., 0% worn to 100% worn). Monitoring this percentage is key to predicting the remaining ssd life expectancy.
How to Compare Your Actual Writes With the SSD’s TBW Rating
A practical way to understand SSD wear is to compare the amount of data the drive has actually written with the endurance rating published for that specific model. SSD monitoring tools may report this information as Total Host Writes, Data Units Written, or a similar manufacturer-specific metric.
For example, if a drive is rated for 600 TBW and monitoring data shows that approximately 120 TB has been written, the drive has used only a portion of its rated endurance. However, this comparison should be used as a general health indicator rather than an exact prediction of failure. A drive can continue functioning beyond its rated TBW, while another drive may fail earlier because of a non-wear-related hardware problem.
Always check the specifications and endurance rating for your exact SSD model because TBW ratings can vary significantly between capacities and product lines.
Decoding SSD S.M.A.R.T. Data Explained
S.M.A.R.T. (Self-Monitoring, Analysis and Reporting Technology) is a monitoring system included in computer hard disk drives and solid-state drives. Its primary function is to detect and report on various indicators of drive reliability, with the intent of anticipating hardware failures. For SSDs, S.M.A.R.T. data includes attributes specific to flash memory wear and health. Understanding these attributes is crucial for effective ssd health monitoring:
Critical Warning: Indicates if the drive has encountered a critical error or is nearing failure.
Available Spare: Shows the percentage of the available spare block pool remaining. As flash cells wear out, the SSD controller replaces them with spare blocks. A low percentage here is a concern.
Percentage Used: This attribute directly reflects the wear level, often showing 0% for a new drive and increasing towards 100% as the drive wears out.
Data Units Written/Read: Total amount of data written to or read from the drive, often measured in gigabytes or terabytes. This helps calculate the actual TBW.
Host Writes/Reads: Similar to Data Units Written/Read, but specifically from the host system’s perspective.
Power On Hours: Total time the SSD has been powered on.
Unsafe Shutdowns: Counts instances where the drive was powered off without proper shutdown procedures, which can sometimes lead to data corruption.
These S.M.A.R.T. attributes provide a detailed picture of your SSD’s operational history and current health status.
How I Interpret SSD Health Metrics in Practice
When reviewing an SSD health report, it is usually more useful to look at several metrics together rather than relying on a single overall health score. An overall status such as “Good” or “Healthy” is helpful, but it does not tell the complete story.
A practical review should begin with any Critical Warning indicators, followed by the wear or Percentage Used value, Available Spare information, total data written, and error-related attributes. If the drive reports a critical warning, repeated uncorrectable errors, or other serious faults, backing up important data should take priority over continued testing.
It is also important to remember that S.M.A.R.T. reporting is not identical across all SSDs. SATA and NVMe drives may expose different attributes, and manufacturers can use different terminology or health calculations. Always interpret unfamiliar values using documentation for your specific drive model whenever possible.
Example: Reading a Typical SSD Health Report
Consider an SSD reporting the following values:
Overall Health Status: Good
Percentage Used: 12%
Available Spare: 100%
Critical Warning: None
Power On Hours: 8,000
In general, this combination would suggest that the drive has accumulated some normal usage while still showing relatively low wear and no obvious critical warning. By contrast, a combination of increasing wear, declining spare capacity, critical warnings, and repeated error counts would deserve more immediate investigation.
Practical Methods to Check SSD Health
Now that you understand the underlying metrics, let’s explore practical methods for how to check SSD health using both built-in operating system tools and dedicated ssd health check software.
Using Built-in Tools: SSD Health Status in Windows 10 and Mac
Both Windows and macOS offer some native capabilities to check basic SSD information:
Windows 10
Optimize Drives Tool:
– Press Windows Key + S, type “defragment”, and select “Defragment and Optimize Drives.”
– In the Optimize Drives window, locate your SSD. The “Media type” column should show “Solid state drive.”
– The “Current status” column will often display “OK” if no immediate issues are detected. While this doesn’t provide detailed wear level, it’s a quick initial check.
PowerShell Command:
– Right-click the Start button and select “Windows PowerShell (Admin).”
– Type the command: Get-PhysicalDisk | Format-Table -AutoSize and press Enter.
– Look for your SSD in the output. The “HealthStatus” column will show “Healthy” or “Warning/Unhealthy” if issues are present. This provides a slightly more detailed status than the Optimize Drives tool.
macOS
Disk Utility:
– Open “Applications” > “Utilities” > “Disk Utility.”
– Select your SSD from the sidebar.
– Click “First Aid.” Running First Aid will check for and attempt to repair directory structure issues, which can sometimes be related to drive health. While it doesn’t show wear level, it confirms the file system’s integrity.
System Information:
– Hold the Option key and click the Apple menu () > “System Information.”
– In the System Information window, navigate to “Storage” or “NVMExpress” (for NVMe SSDs) under the “Hardware” section.
– Here you can find basic information like drive model, capacity, and sometimes S.M.A.R.T. status (e.g., “Verified” or “Failing”). For more detailed S.M.A.R.T. data, third-party tools are usually required for mac ssd health check.
Built-in Health Checks vs. Full SSD Diagnostics
Built-in operating system tools are useful for identifying basic problems, confirming that a drive is detected, and checking for file system issues. However, they may not provide the same level of detail as a dedicated SSD health utility.
If your computer is experiencing repeated storage-related errors, unexplained crashes, or performance problems, it can be useful to combine built-in operating system checks with detailed S.M.A.R.T. monitoring and the diagnostic software provided by the SSD manufacturer.
Leveraging SSD Health Check Software: Free and Paid Options
For a more in-depth analysis of your SSD’s condition, dedicated software is highly recommended. These tools provide detailed S.M.A.R.T. data, wear levels, and often predictive failure analysis.
Popular Free SSD Health Checker Tools:
CrystalDiskInfo (Windows): This is a widely used and highly recommended free ssd health checker. It displays comprehensive S.M.A.R.T. data, including health status (Good, Caution, Bad), temperature, power-on hours, and the percentage of life used. It’s excellent for a quick and detailed overview.
SSD-Z (Windows): Similar to CrystalDiskInfo, SSD-Z provides detailed information about your SSD, including controller, NAND type, and S.M.A.R.T. attributes. It’s a good alternative for those seeking specific technical details.
GSmartControl (Cross-platform): This open-source tool provides a graphical interface for querying S.M.A.R.T. data on various operating systems, including Windows, Linux, and macOS.
Manufacturer-Specific Software:
Many SSD manufacturers offer their own utilities designed to work best with their drives. These often provide firmware updates, performance optimization, and precise health monitoring:
Samsung Magician (Samsung SSDs): Offers detailed drive health status, TBW monitoring, performance benchmarks, and firmware updates specifically for Samsung SSDs. It’s an excellent tool for ssd health monitoring if you own a Samsung drive.
Crucial Storage Executive (Crucial SSDs): Provides similar features for Crucial SSDs, including S.M.A.R.T. data, firmware updates, and over-provisioning management.
WD Dashboard / SanDisk SSD Dashboard (Western Digital/SanDisk SSDs): These tools offer health monitoring, firmware updates, and diagnostic scans for their respective brands.
Using these specialized tools provides the most accurate and comprehensive way to assess your SSD’s health.
Choosing the Right SSD Health Tool
The best SSD health check software often depends on what information you need. A general-purpose tool can be useful when checking multiple brands of drives, while a manufacturer-specific utility may provide features that are unavailable in third-party software.
For the most accurate interpretation of endurance, firmware status, available spare capacity, and model-specific warnings, start by identifying the exact manufacturer and model of your SSD. If the manufacturer provides an official management utility, comparing its results with a third-party S.M.A.R.T. tool can provide a more complete picture.
Before updating SSD firmware, back up important files. Firmware updates can resolve compatibility or reliability issues, but storage maintenance should always be performed carefully because an unexpected interruption during system maintenance can create additional risks.
Interpreting Your SSD Health Status and Next Steps
Once you’ve run a health check, understanding the results is paramount. Knowing how to check SSD health is only half the battle; interpreting the data correctly allows you to take appropriate action.
What a Healthy SSD Report Looks Like
A healthy SSD report typically shows the following:
Overall Health Status: “Good,” “Healthy,” or “OK.”
Wear Level/Percentage Used: A low percentage (e.g., 0-30%) indicates minimal wear. Even after several years of use, a well-managed SSD might still show a low wear percentage.
Available Spare: A high percentage (e.g., 100%) means the drive has all its spare blocks intact.
Critical Warning: No critical warnings or errors reported.
Temperature: Within normal operating ranges (typically 30-50°C under load).
Error Counts: Zero or very low numbers for attributes like “Uncorrectable Error Count” or “CRC Error Count.”
Consistent ssd health monitoring showing these indicators suggests your drive is performing as expected and has significant remaining ssd life expectancy.
Compare SSD Temperature With Your Specific Drive’s Specifications
Temperature readings should be interpreted in the context of your specific SSD model and workload. NVMe SSDs, especially high-performance models installed in compact laptops or systems with limited airflow, can operate at different temperatures than SATA SSDs.
Instead of relying only on a general temperature range, check the operating temperature guidance supplied for your specific drive. Consistently high temperatures may contribute to thermal throttling and performance reductions, so improving airflow or using an appropriate heatsink may be worth considering when supported by your system.
Actions to Take for a Declining or Failing SSD
If your SSD health check reveals concerning indicators or you continue to experience bad ssd symptoms, immediate action is necessary to prevent data loss and address the issue. Here’s what to do if you learn how to tell if ssd is failing:
Immediate Data Backup: This is the most critical step. Back up all essential data to another drive, cloud storage, or an external device. Do not delay this, as a failing SSD can become completely inaccessible without warning.
Reduce Write Operations: Minimize activities that involve heavy writing to the SSD, such as large file transfers, video editing, or installing new software.
Check Warranty: Most SSDs come with a multi-year warranty. If your drive is still under warranty and showing signs of failure, contact the manufacturer for a replacement.
Consider Replacement: If the SSD is out of warranty or severely degraded (e.g., wear level approaching 80-100%, critical warnings), plan for a replacement. Migrating your operating system and data to a new, healthy SSD is the safest course of action.
Investigate Further: Use advanced diagnostic tools or consult with a professional if you’re unsure about the exact cause or severity of the issue.
SSD Health Warning Checklist
If your SSD begins showing concerning health indicators, use the following checklist to prioritize your next steps:
1. Back up important files immediately before performing extensive troubleshooting.
2. Record the exact SSD model, capacity, firmware version, and reported health status.
3. Check for Critical Warning messages, uncorrectable errors, or other serious S.M.A.R.T. indicators.
4. Compare the total data written and Percentage Used values with the manufacturer’s specifications.
5. Check for available firmware updates using the manufacturer’s official utility.
6. Review whether system crashes or errors continue after checking other possible causes such as RAM, overheating, drivers, and file system problems.
7. If important data is already backed up and the drive continues reporting serious errors, plan for replacement rather than relying on the SSD for critical storage.
When an SSD Health Tool Says “Good” but Problems Continue
An SSD reporting a “Good” health status does not automatically mean it is responsible for every performance issue, nor does it guarantee that the rest of the system is functioning correctly. If slowdowns, freezes, or crashes continue while the drive’s health metrics appear normal, investigate other possible causes.
Useful troubleshooting steps can include checking operating system error logs, verifying file system integrity, monitoring system temperatures, testing memory, reviewing storage drivers, and confirming that cables or NVMe connections are secure. This broader approach can prevent unnecessary SSD replacement when the underlying problem is elsewhere.
Frequently Asked Questions About SSD Health
How often should I check my SSD health?
For general users, checking your SSD health every 3-6 months is a good practice. If you perform heavy write operations regularly (e.g., video editing, large database work), more frequent ssd health monitoring (monthly) is advisable. Many ssd health check software tools offer background monitoring and alerts.
If your SSD stores critical business files, creative projects, databases, or other important information, regular backups should remain more important than the frequency of health checks. Monitoring can provide useful warnings, but a reliable backup strategy protects against sudden failures that health software may not predict.
Does defragmenting an SSD affect its health?
No, defragmenting an SSD is generally unnecessary and can even be detrimental. SSDs do not suffer from fragmentation in the same way HDDs do, and the process involves unnecessary write cycles, contributing to wear. Modern operating systems are designed to optimize SSDs without defragmentation.
Can I improve my SSD’s health?
You cannot reverse wear on an SSD, but you can prolong its ssd life expectancy by minimizing unnecessary write operations. This includes:
Ensuring your operating system is configured for SSDs (e.g., TRIM enabled).
Avoiding filling the drive to full capacity (aim for at least 10-15% free space).
Limiting excessive logging or temporary file creation.
Using manufacturer-provided utilities for optimization (e.g., over-provisioning).
Does a 100% Health Score Mean an SSD Is Perfect?
Not necessarily. A 100% health score generally means that the monitoring tool has not detected significant wear according to the metric it uses. It does not guarantee that the SSD is completely free of firmware, controller, connection, power, or other hardware-related problems.
For this reason, SSD health percentages should be interpreted alongside other information, including critical warnings, error counts, system symptoms, firmware status, and the drive’s overall behavior.
Should You Replace an SSD When It Reaches Its TBW Rating?
Reaching an SSD’s rated TBW does not necessarily mean that the drive will stop working immediately. Endurance ratings are useful for understanding the manufacturer’s expected workload and warranty limits, but individual drives can behave differently.
If an SSD has reached or exceeded its endurance rating, continue monitoring its health carefully and ensure that important data is backed up. Replacement may be a sensible precaution when the drive is used for critical workloads or when additional warning signs begin to appear.
Can SSD Health Monitoring Prevent Data Loss?
SSD health monitoring can help identify certain warning signs before a failure becomes critical, but it cannot prevent every type of data loss. Sudden controller failures, electrical problems, accidental deletion, malware, and other issues may occur without a clear S.M.A.R.T. warning.
The safest approach is to combine SSD health monitoring with a regular backup strategy. Important files should exist in more than one location so that a single drive failure does not result in permanent data loss.
Conclusion: Proactive Monitoring for Data Security
Understanding how to check SSD health is a fundamental skill for anyone relying on these high-performance storage devices. By regularly monitoring key metrics like wear level and S.M.A.R.T. data, and recognizing potential bad ssd symptoms, you can anticipate issues before they lead to critical data loss or system downtime. Whether you use built-in operating system tools or specialized ssd health check software, consistent ssd health monitoring empowers you to make informed decisions about your storage, ensuring the security of your data and the continued smooth operation of your computer.